#Postgres database installation
Explore tagged Tumblr posts
Visit Tumblr Blog
Explore Tumblr blogs with no restrictions, modern design and the best experience.
Last Seen Tumblr Blogs


Fun Fact
25% of US internet users with an annual income of $80-100K use Tumblr.
Text
https://codeonedigest.blogspot.com/2023/07/run-postgres-database-in-docker.html
#youtube#video#codeonedigest#docker#postgres installation#postgres db#postgres tutorial#postgres database#postgres#postgresql#dockercontainers#docker image#docker container#docker tutorial#dockerfile
0 notes
Text
i will strangle you

#all jokes aside#excel is not a programming language#and if i hear one more person call it a database they die#microsoft ACCESS is a database manager#and it's not even a very good one#EXCEL IS A GLORIFIED CSV EDITOR#if you don't know the difference between a csv file and a relational database i do not know how to help you#excel is great if you need to do your taxes or calculate income or w/e#but if you need to do anything real#for the love of brian w kernighan please write a script#if you need a database then install postgres#or sqlite#or SOMETHING that is SEARCHABLE in a REASONABLE AMOUNT OF TIME#YOU WILL THANK YOURSELF LATER
1K notes
·
View notes
Text
Java Database Connectivity API contains commonly asked Java interview questions. A good understanding of JDBC API is required to understand and leverage many powerful features of Java technology. Here are few important practical questions and answers which can be asked in a Core Java JDBC interview. Most of the java developers are required to use JDBC API in some type of application. Though its really common, not many people understand the real depth of this powerful java API. Dozens of relational databases are seamlessly connected using java due to the simplicity of this API. To name a few Oracle, MySQL, Postgres and MS SQL are some popular ones. This article is going to cover a lot of general questions and some of the really in-depth ones to. Java Interview Preparation Tips Part 0: Things You Must Know For a Java Interview Part 1: Core Java Interview Questions Part 2: JDBC Interview Questions Part 3: Collections Framework Interview Questions Part 4: Threading Interview Questions Part 5: Serialization Interview Questions Part 6: Classpath Related Questions Part 7: Java Architect Scalability Questions What are available drivers in JDBC? JDBC technology drivers fit into one of four categories: A JDBC-ODBC bridge provides JDBC API access via one or more ODBC drivers. Note that some ODBC native code and in many cases native database client code must be loaded on each client machine that uses this type of driver. Hence, this kind of driver is generally most appropriate when automatic installation and downloading of a Java technology application is not important. A native-API partly Java technology-enabled driver converts JDBC calls into calls on the client API for Oracle, Sybase, Informix, DB2, or other DBMS. Note that, like the bridge driver, this style of driver requires that some binary code be loaded on each client machine. A net-protocol fully Java technology-enabled driver translates JDBC API calls into a DBMS-independent net protocol which is then translated to a DBMS protocol by a server. This net server middleware is able to connect all of its Java technology-based clients to many different databases. The specific protocol used depends on the vendor. In general, this is the most flexible JDBC API alternative. It is likely that all vendors of this solution will provide products suitable for Intranet use. In order for these products to also support Internet access they must handle the additional requirements for security, access through firewalls, etc., that the Web imposes. Several vendors are adding JDBC technology-based drivers to their existing database middleware products. A native-protocol fully Java technology-enabled driver converts JDBC technology calls into the network protocol used by DBMSs directly. This allows a direct call from the client machine to the DBMS server and is a practical solution for Intranet access. Since many of these protocols are proprietary the database vendors themselves will be the primary source for this style of driver. Several database vendors have these in progress. What are the types of statements in JDBC? the JDBC API has 3 Interfaces, (1. Statement, 2. PreparedStatement, 3. CallableStatement ). The key features of these are as follows: Statement This interface is used for executing a static SQL statement and returning the results it produces. The object of Statement class can be created using Connection.createStatement() method. PreparedStatement A SQL statement is pre-compiled and stored in a PreparedStatement object. This object can then be used to efficiently execute this statement multiple times. The object of PreparedStatement class can be created using Connection.prepareStatement() method. This extends Statement interface. CallableStatement This interface is used to execute SQL stored procedures. This extends PreparedStatement interface. The object of CallableStatement class can be created using Connection.prepareCall() method.
What is a stored procedure? How to call stored procedure using JDBC API? Stored procedure is a group of SQL statements that forms a logical unit and performs a particular task. Stored Procedures are used to encapsulate a set of operations or queries to execute on database. Stored procedures can be compiled and executed with different parameters and results and may have any combination of input/output parameters. Stored procedures can be called using CallableStatement class in JDBC API. Below code snippet shows how this can be achieved. CallableStatement cs = con.prepareCall("call MY_STORED_PROC_NAME"); ResultSet rs = cs.executeQuery(); What is Connection pooling? What are the advantages of using a connection pool? Connection Pooling is a technique used for sharing the server resources among requested clients. It was pioneered by database vendors to allow multiple clients to share a cached set of connection objects that provides access to a database. Getting connection and disconnecting are costly operation, which affects the application performance, so we should avoid creating multiple connection during multiple database interactions. A pool contains set of Database connections which are already connected, and any client who wants to use it can take it from pool and when done with using it can be returned back to the pool. Apart from performance this also saves you resources as there may be limited database connections available for your application. How to do database connection using JDBC thin driver ? This is one of the most commonly asked questions from JDBC fundamentals, and knowing all the steps of JDBC connection is important. import java.sql.*; class JDBCTest public static void main (String args []) throws Exception //Load driver class Class.forName ("oracle.jdbc.driver.OracleDriver"); //Create connection Connection conn = DriverManager.getConnection ("jdbc:oracle:thin:@hostname:1526:testdb", "scott", "tiger"); // @machineName:port:SID, userid, password Statement stmt = conn.createStatement(); ResultSet rs = stmt.executeQuery("select 'Hi' from dual"); while (rs.next()) System.out.println (rs.getString(1)); // Print col 1 => Hi stmt.close(); What does Class.forName() method do? Method forName() is a static method of java.lang.Class. This can be used to dynamically load a class at run-time. Class.forName() loads the class if its not already loaded. It also executes the static block of loaded class. Then this method returns an instance of the loaded class. So a call to Class.forName('MyClass') is going to do following - Load the class MyClass. - Execute any static block code of MyClass. - Return an instance of MyClass. JDBC Driver loading using Class.forName is a good example of best use of this method. The driver loading is done like this Class.forName("org.mysql.Driver"); All JDBC Drivers have a static block that registers itself with DriverManager and DriverManager has static initializer method registerDriver() which can be called in a static blocks of Driver class. A MySQL JDBC Driver has a static initializer which looks like this: static try java.sql.DriverManager.registerDriver(new Driver()); catch (SQLException E) throw new RuntimeException("Can't register driver!"); Class.forName() loads driver class and executes the static block and the Driver registers itself with the DriverManager. Which one will you use Statement or PreparedStatement? Or Which one to use when (Statement/PreparedStatement)? Compare PreparedStatement vs Statement. By Java API definitions: Statement is a object used for executing a static SQL statement and returning the results it produces. PreparedStatement is a SQL statement which is precompiled and stored in a PreparedStatement object. This object can then be used to efficiently execute this statement multiple times. There are few advantages of using PreparedStatements over Statements
Since its pre-compiled, Executing the same query multiple times in loop, binding different parameter values each time is faster. (What does pre-compiled statement means? The prepared statement(pre-compiled) concept is not specific to Java, it is a database concept. Statement precompiling means: when you execute a SQL query, database server will prepare a execution plan before executing the actual query, this execution plan will be cached at database server for further execution.) In PreparedStatement the setDate()/setString() methods can be used to escape dates and strings properly, in a database-independent way. SQL injection attacks on a system are virtually impossible when using PreparedStatements. What does setAutoCommit(false) do? A JDBC connection is created in auto-commit mode by default. This means that each individual SQL statement is treated as a transaction and will be automatically committed as soon as it is executed. If you require two or more statements to be grouped into a transaction then you need to disable auto-commit mode using below command con.setAutoCommit(false); Once auto-commit mode is disabled, no SQL statements will be committed until you explicitly call the commit method. A Simple transaction with use of autocommit flag is demonstrated below. con.setAutoCommit(false); PreparedStatement updateStmt = con.prepareStatement( "UPDATE EMPLOYEE SET SALARY = ? WHERE EMP_NAME LIKE ?"); updateStmt.setInt(1, 5000); updateSales.setString(2, "Jack"); updateStmt.executeUpdate(); updateStmt.setInt(1, 6000); updateSales.setString(2, "Tom"); updateStmt.executeUpdate(); con.commit(); con.setAutoCommit(true); What are database warnings and How can I handle database warnings in JDBC? Warnings are issued by database to notify user of a problem which may not be very severe. Database warnings do not stop the execution of SQL statements. In JDBC SQLWarning is an exception that provides information on database access warnings. Warnings are silently chained to the object whose method caused it to be reported. Warnings may be retrieved from Connection, Statement, and ResultSet objects. Handling SQLWarning from connection object //Retrieving warning from connection object SQLWarning warning = conn.getWarnings(); //Retrieving next warning from warning object itself SQLWarning nextWarning = warning.getNextWarning(); //Clear all warnings reported for this Connection object. conn.clearWarnings(); Handling SQLWarning from Statement object //Retrieving warning from statement object stmt.getWarnings(); //Retrieving next warning from warning object itself SQLWarning nextWarning = warning.getNextWarning(); //Clear all warnings reported for this Statement object. stmt.clearWarnings(); Handling SQLWarning from ResultSet object //Retrieving warning from resultset object rs.getWarnings(); //Retrieving next warning from warning object itself SQLWarning nextWarning = warning.getNextWarning(); //Clear all warnings reported for this resultset object. rs.clearWarnings(); The call to getWarnings() method in any of above way retrieves the first warning reported by calls on this object. If there is more than one warning, subsequent warnings will be chained to the first one and can be retrieved by calling the method SQLWarning.getNextWarning on the warning that was retrieved previously. A call to clearWarnings() method clears all warnings reported for this object. After a call to this method, the method getWarnings returns null until a new warning is reported for this object. Trying to call getWarning() on a connection after it has been closed will cause an SQLException to be thrown. Similarly, trying to retrieve a warning on a statement after it has been closed or on a result set after it has been closed will cause an SQLException to be thrown. Note that closing a statement also closes a result set that it might have produced. What is Metadata and why should I use it?
JDBC API has 2 Metadata interfaces DatabaseMetaData & ResultSetMetaData. The DatabaseMetaData provides Comprehensive information about the database as a whole. This interface is implemented by driver vendors to let users know the capabilities of a Database Management System (DBMS) in combination with the driver based on JDBC technology ("JDBC driver") that is used with it. Below is a sample code which demonstrates how we can use the DatabaseMetaData DatabaseMetaData md = conn.getMetaData(); System.out.println("Database Name: " + md.getDatabaseProductName()); System.out.println("Database Version: " + md.getDatabaseProductVersion()); System.out.println("Driver Name: " + md.getDriverName()); System.out.println("Driver Version: " + md.getDriverVersion()); The ResultSetMetaData is an object that can be used to get information about the types and properties of the columns in a ResultSet object. Use DatabaseMetaData to find information about your database, such as its capabilities and structure. Use ResultSetMetaData to find information about the results of an SQL query, such as size and types of columns. Below a sample code which demonstrates how we can use the ResultSetMetaData ResultSet rs = stmt.executeQuery("SELECT a, b, c FROM TABLE2"); ResultSetMetaData rsmd = rs.getMetaData(); int numberOfColumns = rsmd.getColumnCount(); boolean b = rsmd.isSearchable(1); What is RowSet? or What is the difference between RowSet and ResultSet? or Why do we need RowSet? or What are the advantages of using RowSet over ResultSet? RowSet is a interface that adds support to the JDBC API for the JavaBeans component model. A rowset, which can be used as a JavaBeans component in a visual Bean development environment, can be created and configured at design time and executed at run time. The RowSet interface provides a set of JavaBeans properties that allow a RowSet instance to be configured to connect to a JDBC data source and read some data from the data source. A group of setter methods (setInt, setBytes, setString, and so on) provide a way to pass input parameters to a rowset's command property. This command is the SQL query the rowset uses when it gets its data from a relational database, which is generally the case. Rowsets are easy to use since the RowSet interface extends the standard java.sql.ResultSet interface so it has all the methods of ResultSet. There are two clear advantages of using RowSet over ResultSet RowSet makes it possible to use the ResultSet object as a JavaBeans component. As a consequence, a result set can, for example, be a component in a Swing application. RowSet be used to make a ResultSet object scrollable and updatable. All RowSet objects are by default scrollable and updatable. If the driver and database being used do not support scrolling and/or updating of result sets, an application can populate a RowSet object implementation (e.g. JdbcRowSet) with the data of a ResultSet object and then operate on the RowSet object as if it were the ResultSet object. What is a connected RowSet? or What is the difference between connected RowSet and disconnected RowSet? or Connected vs Disconnected RowSet, which one should I use and when? Connected RowSet A RowSet object may make a connection with a data source and maintain that connection throughout its life cycle, in which case it is called a connected rowset. A rowset may also make a connection with a data source, get data from it, and then close the connection. Such a rowset is called a disconnected rowset. A disconnected rowset may make changes to its data while it is disconnected and then send the changes back to the original source of the data, but it must reestablish a connection to do so. Example of Connected RowSet: A JdbcRowSet object is a example of connected RowSet, which means it continually maintains its connection to a database using a JDBC technology-enabled driver. Disconnected RowSet A disconnected rowset may have a reader (a RowSetReader object) and a writer (a RowSetWriter object) associated with it.
The reader may be implemented in many different ways to populate a rowset with data, including getting data from a non-relational data source. The writer can also be implemented in many different ways to propagate changes made to the rowset's data back to the underlying data source. Example of Disconnected RowSet: A CachedRowSet object is a example of disconnected rowset, which means that it makes use of a connection to its data source only briefly. It connects to its data source while it is reading data to populate itself with rows and again while it is propagating changes back to its underlying data source. The rest of the time, a CachedRowSet object is disconnected, including while its data is being modified. Being disconnected makes a RowSet object much leaner and therefore much easier to pass to another component. For example, a disconnected RowSet object can be serialized and passed over the wire to a thin client such as a personal digital assistant (PDA). What is the benefit of having JdbcRowSet implementation? Why do we need a JdbcRowSet like wrapper around ResultSet? The JdbcRowSet implementation is a wrapper around a ResultSet object that has following advantages over ResultSet This implementation makes it possible to use the ResultSet object as a JavaBeans component. A JdbcRowSet can be used as a JavaBeans component in a visual Bean development environment, can be created and configured at design time and executed at run time. It can be used to make a ResultSet object scrollable and updatable. All RowSet objects are by default scrollable and updatable. If the driver and database being used do not support scrolling and/or updating of result sets, an application can populate a JdbcRowSet object with the data of a ResultSet object and then operate on the JdbcRowSet object as if it were the ResultSet object. Can you think of a questions which is not part of this post? Please don't forget to share it with me in comments section & I will try to include it in the list.
0 notes
Text
蜘蛛池源码如何部署?
蜘蛛池,也被称为“爬虫池”或“爬虫集群”,是一种用于提高网络爬取效率的技术。通过将多个爬虫任务分配到不同的服务器上运行,可以显著提升数据抓取的速度和稳定性。本文将详细介绍如何部署蜘蛛池源码,帮助你快速搭建自己的爬虫集群。
1. 环境准备
在开始部署之前,确保你的服务器环境满足以下要求:
- 操作系统:Linux(推荐Ubuntu)
- Python环境:Python 3.x
- 其他依赖库:Scrapy、Twisted等
安装Python环境
如果你的服务器尚未安装Python 3.x,可以通过以下命令进行安装:
```bash
sudo apt-get update
sudo apt-get install python3
```
安装依赖库
使用pip安装所需的Python库:
```bash
pip3 install scrapy twisted
```
2. 获取源码
从GitHub或其他代码托管平台获取蜘蛛池的源码。假设源码位于`https://github.com/username/spiderpool.git`,你可以通过以下命令克隆项目:
```bash
git clone https://github.com/username/spiderpool.git
cd spiderpool
```
3. 配置文件
进入项目目录后,找到配置文件(通常为`settings.py`),根据你的需求进行配置。主要配置项包括数据库连接信息、爬虫任务队列等。
```python
DATABASE = {
'drivername': 'postgres',
'host': 'localhost',
'port': '5432',
'username': 'your_username',
'password': 'your_password',
'database': 'spiderpool'
}
```
4. 启动服务
启动蜘蛛池服务通常需要运行一个主进程和多个工作进程。具体命令可能因项目不同而异,但一般形式如下:
```bash
python manage.py startmaster
python manage.py startworker
```
5. 监控与维护
部署完成后,定期监控蜘蛛池的运行状态,确保所有工作进程正常运行。同时,根据��际需求调整配置参数,优化爬虫性能。
讨论点
你在部署蜘蛛池的过程中遇到了哪些问题?又是如何解决的呢?欢迎在评论区分享你的经验,让我们一起学习进步!
加飞机@yuantou2048

谷歌霸屏
Google外链购买
0 notes
Link
0 notes
Text
Using Docker for Full Stack Development and Deployment

1. Introduction to Docker
What is Docker? Docker is an open-source platform that automates the deployment, scaling, and management of applications inside containers. A container packages your application and its dependencies, ensuring it runs consistently across different computing environments.
Containers vs Virtual Machines (VMs)
Containers are lightweight and use fewer resources than VMs because they share the host operating system’s kernel, while VMs simulate an entire operating system. Containers are more efficient and easier to deploy.
Docker containers provide faster startup times, less overhead, and portability across development, staging, and production environments.
Benefits of Docker in Full Stack Development
Portability: Docker ensures that your application runs the same way regardless of the environment (dev, test, or production).
Consistency: Developers can share Dockerfiles to create identical environments for different developers.
Scalability: Docker containers can be quickly replicated, allowing your application to scale horizontally without a lot of overhead.
Isolation: Docker containers provide isolated environments for each part of your application, ensuring that dependencies don’t conflict.
2. Setting Up Docker for Full Stack Applications
Installing Docker and Docker Compose
Docker can be installed on any system (Windows, macOS, Linux). Provide steps for installing Docker and Docker Compose (which simplifies multi-container management).
Commands:
docker --version to check the installed Docker version.
docker-compose --version to check the Docker Compose version.
Setting Up Project Structure
Organize your project into different directories (e.g., /frontend, /backend, /db).
Each service will have its own Dockerfile and configuration file for Docker Compose.
3. Creating Dockerfiles for Frontend and Backend
Dockerfile for the Frontend:
For a React/Angular app:
Dockerfile
FROM node:14 WORKDIR /app COPY package*.json ./ RUN npm install COPY . . EXPOSE 3000 CMD ["npm", "start"]
This Dockerfile installs Node.js dependencies, copies the application, exposes the appropriate port, and starts the server.
Dockerfile for the Backend:
For a Python Flask app
Dockerfile
FROM python:3.9 WORKDIR /app COPY requirements.txt . RUN pip install -r requirements.txt COPY . . EXPOSE 5000 CMD ["python", "app.py"]
For a Java Spring Boot app:
Dockerfile
FROM openjdk:11 WORKDIR /app COPY target/my-app.jar my-app.jar EXPOSE 8080 CMD ["java", "-jar", "my-app.jar"]
This Dockerfile installs the necessary dependencies, copies the code, exposes the necessary port, and runs the app.
4. Docker Compose for Multi-Container Applications
What is Docker Compose? Docker Compose is a tool for defining and running multi-container Docker applications. With a docker-compose.yml file, you can configure services, networks, and volumes.
docker-compose.yml Example:
yaml
version: "3" services: frontend: build: context: ./frontend ports: - "3000:3000" backend: build: context: ./backend ports: - "5000:5000" depends_on: - db db: image: postgres environment: POSTGRES_USER: user POSTGRES_PASSWORD: password POSTGRES_DB: mydb
This YAML file defines three services: frontend, backend, and a PostgreSQL database. It also sets up networking and environment variables.
5. Building and Running Docker Containers
Building Docker Images:
Use docker build -t <image_name> <path> to build images.
For example:
bash
docker build -t frontend ./frontend docker build -t backend ./backend
Running Containers:
You can run individual containers using docker run or use Docker Compose to start all services:
bash
docker-compose up
Use docker ps to list running containers, and docker logs <container_id> to check logs.
Stopping and Removing Containers:
Use docker stop <container_id> and docker rm <container_id> to stop and remove containers.
With Docker Compose: docker-compose down to stop and remove all services.
6. Dockerizing Databases
Running Databases in Docker:
You can easily run databases like PostgreSQL, MySQL, or MongoDB as Docker containers.
Example for PostgreSQL in docker-compose.yml:
yaml
db: image: postgres environment: POSTGRES_USER: user POSTGRES_PASSWORD: password POSTGRES_DB: mydb
Persistent Storage with Docker Volumes:
Use Docker volumes to persist database data even when containers are stopped or removed:
yaml
volumes: - db_data:/var/lib/postgresql/data
Define the volume at the bottom of the file:
yaml
volumes: db_data:
Connecting Backend to Databases:
Your backend services can access databases via Docker networking. In the backend service, refer to the database by its service name (e.g., db).
7. Continuous Integration and Deployment (CI/CD) with Docker
Setting Up a CI/CD Pipeline:
Use Docker in CI/CD pipelines to ensure consistency across environments.
Example: GitHub Actions or Jenkins pipeline using Docker to build and push images.
Example .github/workflows/docker.yml:
yaml
name: CI/CD Pipeline on: [push] jobs: build: runs-on: ubuntu-latest steps: - name: Checkout Code uses: actions/checkout@v2 - name: Build Docker Image run: docker build -t myapp . - name: Push Docker Image run: docker push myapp
Automating Deployment:
Once images are built and pushed to a Docker registry (e.g., Docker Hub, Amazon ECR), they can be pulled into your production or staging environment.
8. Scaling Applications with Docker
Docker Swarm for Orchestration:
Docker Swarm is a native clustering and orchestration tool for Docker. You can scale your services by specifying the number of replicas.
Example:
bash
docker service scale myapp=5
Kubernetes for Advanced Orchestration:
Kubernetes (K8s) is more complex but offers greater scalability and fault tolerance. It can manage Docker containers at scale.
Load Balancing and Service Discovery:
Use Docker Swarm or Kubernetes to automatically load balance traffic to different container replicas.
9. Best Practices
Optimizing Docker Images:
Use smaller base images (e.g., alpine images) to reduce image size.
Use multi-stage builds to avoid unnecessary dependencies in the final image.
Environment Variables and Secrets Management:
Store sensitive data like API keys or database credentials in Docker secrets or environment variables rather than hardcoding them.
Logging and Monitoring:
Use tools like Docker’s built-in logging drivers, or integrate with ELK stack (Elasticsearch, Logstash, Kibana) for advanced logging.
For monitoring, tools like Prometheus and Grafana can be used to track Docker container metrics.
10. Conclusion
Why Use Docker in Full Stack Development? Docker simplifies the management of complex full-stack applications by ensuring consistent environments across all stages of development. It also offers significant performance benefits and scalability options.
Recommendations:
Encourage users to integrate Docker with CI/CD pipelines for automated builds and deployment.
Mention the use of Docker for microservices architecture, enabling easy scaling and management of individual services.
WEBSITE: https://www.ficusoft.in/full-stack-developer-course-in-chennai/
0 notes
Text
Sonarqube Setup with Postgresql
sonarqube installation along with java 17 Postgresql Database Prerequisites Need an AWS EC2 instance (min t2.small) Install Java 17 (openjdk-17) apt-get update apt list | grep openjdk-17 apt-get install openjdk-17-jdk -y Install & Setup Postgres Database for SonarQube Source: https://www.postgresql.org/download/linux/ubuntu/ Install Postgresql database Import the repository signing…
0 notes
Text
Unlocking PostgreSQL Power: Tips, Tricks, and Hands-On Tutorial
Welcome to our PostgreSQL Tutorial! PostgreSQL, often called "Postgres," is a powerful, open-source database system used by developers and businesses worldwide. Whether you’re building a small application or managing large datasets, PostgreSQL is versatile and reliable.
What is PostgreSQL?
PostgreSQL is a relational database management system (RDBMS). This means it organizes data into tables that can be linked by relationships. It supports SQL (Structured Query Language), the standard language for interacting with databases.
Why Choose PostgreSQL?
Open Source: PostgreSQL is free to use and has a strong community support.
Extensibility: It allows you to create custom functions and data types.
Performance: PostgreSQL handles large volumes of data efficiently.
ACID Compliance: Ensures data integrity with reliable transactions.
Getting Started
Installation: Download and install PostgreSQL from the official website. It supports Windows, macOS, and Linux.
Connecting to PostgreSQL: Use the psql command-line tool or GUI tools like pgAdmin to connect and manage your database.
Creating a Database: Use the command CREATE DATABASE followed by your desired database name.
Basic Operations
Inserting Data: Add records using the INSERT INTO command.
Querying Data: Retrieve data with the SELECT statement.
Updating Data: Modify existing records using UPDATE.
Deleting Data: Remove unwanted records with DELETE.
Explore More
To dive deeper into PostgreSQL and explore advanced features, check out this PostgreSQL Tutorial. Happy learning!
By following this PostgreSQL Tutorial, you'll quickly become comfortable managing and querying your databases with ease.
0 notes
Text
Updating a Tiny Tiny RSS install behind a reverse proxy

Screenshot of my Tiny Tiny RSS install on May 7th 2024 after a long struggle with 502 errors. I had a hard time when trying to update my Tiny Tiny RSS instance running as Docker container behind Nginx as reverse proxy. I experienced a lot of nasty 502 errors because the container did not return proper data to Nginx. I fixed it in the following manner: First I deleted all the containers and images. I did it with docker rm -vf $(docker ps -aq) docker rmi -f $(docker images -aq) docker system prune -af Attention! This deletes all Docker images! Even those not related to Tiny Tiny RSS. No problem in my case. It only keeps the persistent volumes. If you want to keep other images you have to remove the Tiny Tiny RSS ones separately. The second issue is simple and not really one for me. The Tiny Tiny RSS docs still call Docker Compose with a hyphen: $ docker-compose version. This is not valid for up-to-date installs where the hyphen has to be omitted: $ docker compose version. The third and biggest issue is that the Git Tiny Tiny RSS repository for Docker Compose does not exist anymore. The files have to to be pulled from the master branch of the main repository https://git.tt-rss.org/fox/tt-rss.git/. The docker-compose.yml has to be changed afterwards since the one in the repository is for development purposes only. The PostgreSQL database is located in a persistent volume. It is not possible to install a newer PostgreSQL version over it. Therefore you have to edit the docker-compose.yml and change the database image image: postgres:15-alpine to image: postgres:12-alpine. And then the data in the PostgreSQL volume were owned by a user named 70. Change it to root. Now my Tiny Tiny RSS runs again as expected. Read the full article
0 notes
Text
How to install PostgreSQL 16 and pgAdmin4
PostgreSQL 16 and pgAdmin4 What is PostgreSQL PostgreSQL, often referred to as Postgres, is a powerful, open-source relational database management system known for its robust features and extensibility. It has gained popularity for its ability to handle complex data and querying requirements, making it a suitable choice for a wide range of applications, from small projects to large enterprise…
View On WordPress
0 notes
Text
Setting up a local PostgreSQL database for a Spring Boot JPA (Java Persistence API) application involves several steps. Below, I'll guide you through the process:
1. Install PostgreSQL:
Download and install PostgreSQL from the official website: PostgreSQL Downloads.
During the installation, remember the username and password you set for the PostgreSQL superuser (usually 'postgres').
2. Create a Database:
Open pgAdmin or any other PostgreSQL client you prefer.
Log in using the PostgreSQL superuser credentials.
Create a new database. You can do this through the UI or by running SQL command:sqlCopy codeCREATE DATABASE yourdatabasename;
3. Add PostgreSQL Dependency:
Open your Spring Boot project in your favorite IDE.
Add PostgreSQL JDBC driver to your pom.xml if you're using Maven, or build.gradle if you're using Gradle. For Maven, add this dependency:xmlCopy code<dependency> <groupId>org.postgresql</groupId> <artifactId>postgresql</artifactId> <version>42.2.24</version> <!-- Use the latest version --> </dependency>
4. Configure application.properties:
In your application.properties or application.yml file, configure the PostgreSQL database connection details:propertiesCopy codespring.datasource.url=jdbc:postgresql://localhost:5432/yourdatabasename spring.datasource.username=postgres spring.datasource.password=yourpassword spring.jpa.properties.hibernate.dialect=org.hibernate.dialect.PostgreSQLDialect spring.jpa.hibernate.ddl-auto=update
5. Create Entity Class:
Create your JPA entity class representing the database table. Annotate it with @Entity, and define the fields and relationships.
For example:javaCopy code@Entity public class YourEntity { @Id @GeneratedValue(strategy = GenerationType.IDENTITY) private Long id; private String name; // other fields, getters, setters }
6. Create Repository Interface:
Create a repository interface that extends JpaRepository for your entity. Spring Data JPA will automatically generate the necessary CRUD methods.
For example:javaCopy codepublic interface YourEntityRepository extends JpaRepository<YourEntity, Long> { // custom query methods if needed }
7. Use the Repository in Your Service:
Inject the repository interface into your service class and use it to perform database operations.
8. Run Your Spring Boot Application:
Run your Spring Boot application. Spring Boot will automatically create the necessary tables based on your entity classes and establish a connection to your PostgreSQL database.
That's it! Your Spring Boot JPA application is now connected to a local PostgreSQL database. Remember to handle exceptions, close connections, and follow best practices for security, especially when dealing with sensitive data and database connections
Call us on +91-84484 54549
Mail us on [email protected]
Website: Anubhav Online Trainings | UI5, Fiori, S/4HANA Trainings
youtube
0 notes
Text
#youtube#video#codeonedigest#microservices#microservice#docker#springboot#spring boot#postgres installation#postgres db#postgresql#postgres tutorial#postgres database#postgres#dockercontainers#docker image#docker container#docker tutorial#dockerfile#spring boot microservices#java microservice#microservice tutorial
0 notes
Text
Let's do Fly and Bun🚀
0. Sample Bun App
1. Install flycll
$ brew install flyctl
$ fly version fly v0.1.56 darwin/amd64 Commit: 7981f99ff550f66def5bbd9374db3d413310954f-dirty BuildDate: 2023-07-12T20:27:19Z
$ fly help Deploying apps and machines: apps Manage apps machine Commands that manage machines launch Create and configure a new app from source code or a Docker image. deploy Deploy Fly applications destroy Permanently destroys an app open Open browser to current deployed application Scaling and configuring: scale Scale app resources regions V1 APPS ONLY: Manage regions secrets Manage application secrets with the set and unset commands. Provisioning storage: volumes Volume management commands mysql Provision and manage PlanetScale MySQL databases postgres Manage Postgres clusters. redis Launch and manage Redis databases managed by Upstash.com consul Enable and manage Consul clusters Networking configuration: ips Manage IP addresses for apps wireguard Commands that manage WireGuard peer connections proxy Proxies connections to a fly VM certs Manage certificates Monitoring and managing things: logs View app logs status Show app status dashboard Open web browser on Fly Web UI for this app dig Make DNS requests against Fly.io's internal DNS server ping Test connectivity with ICMP ping messages ssh Use SSH to login to or run commands on VMs sftp Get or put files from a remote VM. Platform overview: platform Fly platform information Access control: orgs Commands for managing Fly organizations auth Manage authentication move Move an app to another organization More help: docs View Fly documentation doctor The DOCTOR command allows you to debug your Fly environment help commands A complete list of commands (there are a bunch more)
2. Sign up
$ fly auth signup
or
$ fly auth login
3. Launch App
Creating app in /Users/yanagiharas/works/bun/bun-getting-started/quickstart Scanning source code Detected a Bun app ? Choose an app name (leave blank to generate one): hello-bun
4. Dashboard
0 notes
Text
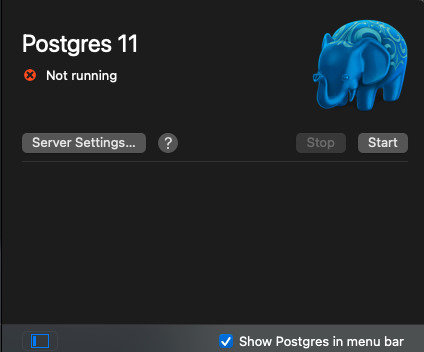
The data directory contains an old postmaster.pid file
PostgreSQL Connection Failure
I experienced this issue when my laptop crushed and after rebooting, PostgreSQL was unable to connect to the database. I attempted to start my server and this error dialog window appeared.
The Problem: Two instances of the same PostgreSQL server cannot run on the same data directory at the same time thanks to the postmaster.pid lock file. Follow the link for more information about what a postmaster.pid file is, otherwise let's move on to resolving our issues.

STEP 1:
Click on the “OK” button to close the dialog window or open the Postgres.app desktop app if its not already open

STEP 2
Click on “Server Settings…” button
Click on Show button next to the Data Directory. This should open the data directory of your PostgreSQl installation.

STEP 3
Once you have located your postmaster.pid file. Delete it!

STEP 4
After deleting the file, the error message should change from "Stale postmaster.pid file" to "Not running" on the Postgres GUI app . Now just start your PostgreSQL server by clicking the "Start" button on the Postgres GUI app
Finally

0 notes
Photo

Learn PostgreSQL - Full Course for Beginners ☞ http://on.edusavecoupon.net/dc7fc4eeca #SQL #PostgreSQL #Databases #Codequs #Morioh
#SQL#postgresql#structured query language#postgresql course#sql tutorial#learn sql#postgresql tutorial#database#postgresql tutorial for beginners#databases#postgres#ingres#relational database#postquel#windows 10#installation#pgadmin#sql beginners#sql course#sql lesson#sql video#sql video tutorial#sql video tutorial for beginners#postgres tutorial#postgressql#history of postgresql#what is postgres#what is postgresql#sql#codequs
1 note
·
View note